Everything for Electronics

Tech Forum


August 2016

Temperamental Trailer

The lights on my boat trailer work erratically. Sometimes they work fine (turn signals, brakes, and running lights); other times, when I press the brake pedal, only the right turn light comes on and all the running lights go out! Short of tearing it all out and re-wiring from scratch, any tips on how to locate the fault and fix it?

#8162
Craig Priolo
Saint Louis, MO


Answers

Sounds like a grounding problem. Take a jumper cable between the hitch and trailer frame to make sure you have the trailer grounded. If this is a tilt trailer then also jump across the pivot point to make sure all sections of the frame is grounded. Lights work? Then check your ground to car frame on car side of trailer light plug. Check the ground on the trailer side of plug to trailer frame. If it tilts then install a permanent jumper across the pivot. The reason it is intermittent is the ground is only sometimes through the hitch ball. When there is a no ground situation, the lighted bulb is feeding back through the other bulbs positive wiring.

Steve Benson
New Castle, IN

There is not enough information given to arrive at a certain answer, since a lot of necessary information is missing but it looks as if you have a ground problem. On my trailers I have seen the same issues and the culprit was a poor ground connection, raising the ground potential at the offending lights so high, that the running lights turn off when the relatively large brake/turn lights are turned on, assuming the running lights are grounded at the left lights.

Diagnostics is easy, measure the ground potential directly at the offending light bulbs against a known good ground, the trailer connector is best. However, it needs to be said that there are many different wiring schemes such as 4-way, 5-way and 7-way plugs, electric brakes, break-away and other batteries and relays which can cause issues – if need be, you need to measure all signals and draw your own conclusions. To get a good ground, the connections need to be corrosion and oxidation free. You can use dielectric grease to prevent early corrosion.

I have had to run separate heavy ground wires to all consumers in star fashion starting from the plug to fix serious issues. Lights which get their ground connection through their mounting studs and electric brakes with their high current draw are especially troublesome.

Walter Heissenberger
Bennington, NH

I have spent my life fixing the sins of good intentioned people who were in a hurry. First of all, NO, there is no easy fix! But understand the harsh environment, and you can stave off the corrosion gremlins for a good while. Replacing old lights with the new waterproof LED fixtures makes huge sense.

(1)  Assume that ALL parts are corroded, and NONE are salvageable. If you won't do this, REMOVE and REWIRE the ground bolt. Grind, file or sand the frame where the new bolt will attach, and GREASE  EVERYTHING thoroughly. Use the cheapest tub of wheel bearing grease from the auto parts store, or (better) marine grease for $2 a pound more. Better to run separate ground wires to all lights individually.

(2)  GREASE ALL WIRES BEFORE YOU PUT THEM INTO THE CRIMP TERMINALS. Do NOT solder anything that you can crimp. Fill the crimp terminals full of grease before you insert the wire, also. Don't worry, the crimper will expel enough grease to make a good connection. Pull on the finished crimp splice. If it comes apart, learn how to do it right. My all-time favorite crimper is the Dimple-Crimper. I know it is only for bare uninsulated barrels, but it holds the wire better. Feel free to fill a piece of shrink tubing with grease and put it over any splices.

(3)  OPEN UP any old splice, as it was likely done poorly. Use a Western Union Splice (soldered) or a new butt-joint connector. TRUST NOTHING!

(4)  Sand the bulbs clean, then grease them gently. The grease keeps the corrosion from starting. Clean the sockets, too. Better to replace them. ALL METAL PARTS ARE SUSPECT. Jumper over any rivet from brass piece to brass piece with a short piece of wire.

(5) Remember, I TOLD YOU SO! If this doesn't work, go back and put in all new wiring, but DO IT RIGHT. The fresh or salt water environment is out to get you, and to eat all your stuff. Live with the constant  cleaning/greasing/replacing of your equipment, and keep after it! There is NO EXCUSE for losing a brake light!

Hap DeSimone
Santa Barbara, CA

What you describe are classic signs of a bad ground (return) line to your trailer. The quickest way to confirm this is to take a heavy jumper wire and connect it to a clean metal spot on the trailer and the other end to the towing vehicle bumper or frame. (using one line of a battery jumper cable works good for this!) If the lights work normally now, it means the trailer lights were being grounded only through the trailer hitch. Even on the smallest four pin trailer connector, one pin is for the ground connection. It is the white wire on the pin that is opposite of the other three. This is usually corroded and should be cleaned or replaced. I have seen some trailers that do not have this wire connected at all!. Make sure it is actually connected to the frame. Most auto or RV stores have replacement plugs and sockets. The standard four pin wire connector color code is: yellow is left turn, green is right turn, brown is tail lights, and white is ground.

Ron Kmecik
East Springfield, PA

Likely poor ground connections cause the intermittent lamp behavior you observe. A trailer frame provides a poor common ground for lamps. Run a separate ground wire to each lamp socket and join them near the vehicle-to-trailer connection. Then use a single ground wire from that point to the trailer-side connector's ground pin. Also ensure you have a good clean connector. Next, connect the vehicle-side ground wire to a good grounding point on the vehicle's frame. Better yet, run a separate vehicle-side ground back to the battery. Fourteen-gauge stranded wire should work well. Check connections regularly.

Jon Titus
Herriman, UT

No doubt about it, trailer lights are a pain. There are a multitude of possible trouble points.

First of all, if you are launching your boat correctly, then the back end and sometimes the whole thing gets dunked under water. The channels of the trailer frame get filled with water and never really have a chance to fully dry out. Since the channels are steel, they begin to rust. Rust turns clean, shiny ground connections into high-resistance points and strange things begin to happen. The drain holes allow little critters access to the inside of the channels where they set up housekeeping which includes munching on your wires.

The cable feeding the lights from your vehicle gets a lot of flexing and can fail in a whole bunch of ways, especially that flat 4-conductor stuff. The lampholders on the trailer are also prone to failure from the periodic dunkings, even the ones claiming to be sealed.

And do not forget the connectors themselves. The vehicle mounted connector is vulnerable to all kinds of weather conditions 365 days a year which means it is susceptible to oxidation and corrosion.

I have to warn you right now that you have to be careful when working on the vehicle connector, especially if it is the large, round 7 contact type. One of the contacts has full vehicle battery voltage on it continuously, protected by a 30- or 40-amp fuse. If you accidentally short this contact to ground, additional damage can result.

So disconnect the battery first, or at least pull the fuse. Diagnosis: first thing you have to do is isolate whether the problems are vehicle or trailer related. Could be both. The auto parts store will sell you a nifty little tester with several LED’s that you plug into the vehicle. and will indicate whether or not a voltage appears on a specific contact when the corresponding circuit is energized.

These can be useful, but have their limits. An LED is a low-current device compared to the current drawn by your lights. If you have a less-than-perfect connection somewhere in the system the LED will merrily light up indicating everything is wonderful. But substitute a real world load of a few amps and the resistance of the poor connection will drop the available voltage dramatically. Same goes for using your multimeter: the current drawn by the meter is way too low for high resistance connections to have much of an effect. What you can do, however, is connect the trailer to the vehicle, then start checking various points with the meter since the trailer is the real world load condition for the circuit.

Establish a good connection to the vehicle battery negative terminal (assuming a negative ground system) for the minus side of the meter. Then begin checking the various points on the trailer while the lights are energized.

You can also check for crummy ground connections by touching the meter probe to the shell of each lamp. You should read no more than a few millivolts from the shell to ground. Anything greater than a volt is definitely suspect.

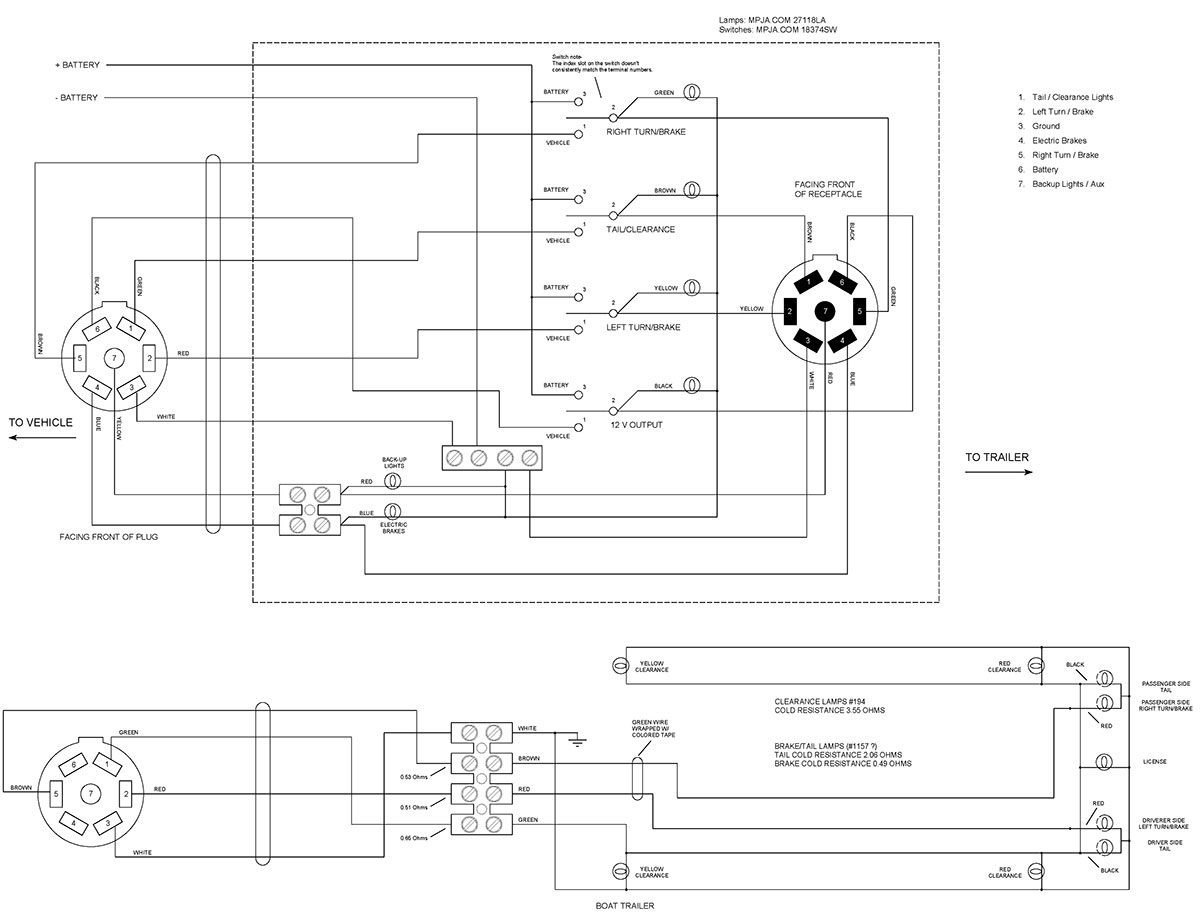
What I ended up doing is building a box that connects between the vehicle and the trailer, with a lamp (incandescent, for the reason cited above) for each circuit so I can see at a glance whether the circuits are getting power from the vehicle or not. The box also allows me to connect a stand-alone battery to the trailer and power each circuit individually for testing purposes. The diagram for it is below, should you be interested. It has saved me lots of time and trouble.
Jerry McCarty
Jackson, MI

Sounds like a classic case of a bad ground. Boat trailers are bad for this type of problem. Most manufacturers use the steel body of the trailer as the ground return to the tow vehicle.

You will need to check the ground connections at each lamp, and at the harness (to the tow vehicle) connection. When you find the bad connection, clean any rust or corrosion off, then use a paste corrosion inhibitor (zinc suspended in a heavy grease such as this: [url=http://sw-em.com/anti_corrosive_paste.htm]http://sw-em.com/anti_corrosive_paste.htm[/url])on the connection before reattaching.

Use an ohmmeter to check lamp to ground (steel chassis) connections, but also don’t forget to check where steel members tie together (if bolted) to ensure the ground passes through.

You may want to run (recommended) a separate ground wire to each lamp, and connect it directly to the cable harness at the hitch.

Ray
Canada

The answer is simple: Fix the grounds. The reason that one light lights is that the one light that lights has the lowest resistance connection to the power source (brake light circuit in the car) and without a secure ground connection, the circuit through the lamp is completed through the filaments of all the other lamps back to ground.

Especially with boat trailers, you cannot rely on the metal frame of the trailer for a secure ground. Corrosion between the steel parts insulates them from each other. Similarly, you cannot rely on the trailer ball providing a good contact to vehicle ground. Therefore, you have to have a good source of ground in the vehicle to the trailer light connector and the connector on the trailer end should be firmly bonded to the trailer frame.

For best results, there should be a ground wire that connects to that same point on the trailer frame going to each light on the trailer.

George Andersen
New Port Richey, FL

Check the grounds first. Often, they use the trailer chassis as ground. When a ground pops loose, bulbs wind up in series that weren’t supposed to be, causing weird symptoms like you describe.

Chip Veres
Miami, FL

This sounds like a bad ground issue, indicated by other lights turning off when one turns on.

ince the frame is likely the common ground and not a separate wire, start with the ground connection where the wiring harness connects to the trailer. Also check the trailer/car connectors grounds. The lights may have a ground wire to the frame, or are grounded by the fixture mounting screws, check those screws, likely rusty.

Since it’s sometimes working, it’s a connection going bad or getting worse. Not surprising, considering they keep getting dunked in water.

Doug Arndt
Chicago, Il