Build An Audible Milliohmmeter
By Paul Florian
Kelvin Measurement
This project uses a four-point resistance measurement process also known as the Kelvin method. This procedure uses a current source to determine the value of an unidentified resistance. A constant current flows through the unknown resistance and the voltage drop across it is measured. Note that the current source and voltage measurement wires are soldered together at the test prod tips Figure 2.
Because the voltage drop across the unidentified resistance is measured at the probe tips, the resistance of the test leads carrying the constant current is not included. The resistance under test can be found by dividing the voltage drop between the test prods by the current source.
Theory
The design is composed of the following:
a) 50 milliamp Current Sink
b) Amplifier with a gain of 470
c) Voltage Controlled Oscillator (VCO)
d) Chopper e) Flip-Flop and Speaker
Transistor Q1 forms a 50 milliamp current sink. To find the voltage drop for a one milliohm resistance, multiply the current source by the resistance: 0.05 * 0.001 = 5 uV. U1 is a differential amplifier with a gain of 470. For a 5 uV input, the output of U1 pin 6 is 5 uV * 470 = 23.5 mV per one milliohm of test resistance.
U2 and U4 form a VCO. U2 is a current source whose output is controlled by the voltage at U1, pin 6. When the current source charges C2, its voltage ramps up in a linear fashion until it reaches U4’s threshold level (2/3 * 9V = 6V). Then the internal transistor of U4 discharges C2 until it reaches U4’s trigger voltage level (1/3 * 9V = 3V). The output of U4, pin 3 goes low during the discharge of C2. Then it goes high while C2 charges to 6V again. When the voltage input to the VCO increases, the source current also increases. This causes C2 to be charged in less time. The result is an oscillation frequency proportional to the voltage at the input of the current source. If the input voltage is zero, the output frequency (U4, pin 3) is zero. The frequency of the VCO increases at a rate of 1,250 Hz per volt.
I found it easier to discern changes in pitch by “chopping” the VCO on and off. U3 generates a 3 Hz signal at pin 3. This drives the Reset input of U4, enabling the VCO at a 3 Hz rate. U5A is a divide-by-two flip-flop which produces a square wave at U5A, pin 1. This square wave has an oscillation frequency of 625 Hz per volt. The speaker is driven by transistor Q2 with a power of approximately 100 mW.
Construction/Testing
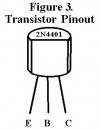
When building the Kelvin cables, use the phono plugs and test prods found in the Parts List. Refer to Figure 2. Note that the wire I used for this purpose was a stereo audio cable with separate shields for the left and right channels. Construct the circuit using whatever assembly technique you prefer. Photo 1 shows the circuit assembled on a breadboard. When mounting C1, keep it as close as possible to where the wire from J1 attaches to the +9V on the circuit board. Figure 3 shows the pin designations for Q1 and Q2. Once the device has been assembled, it needs to be calibrated. Apply 7 VDC to the 9V battery connection. Plug the Kelvin test leads into J1 and J2. Short the leads together and adjust R3 for an output frequency of 330 Hz at the speaker. Next, install a new 9V alkaline battery and close S1.
To test the milliohmmeter, obtain a one ft. length of 22 gauge bare copper wire. Press the test probes on the wire six inches apart and listen to the tone. Move the probes closer together, and the frequency should decrease. If the probes are moved farther apart, the frequency should increase. The speaker’s frequency change is 0.0235 V / milliohm * 625 Hz / V = 14.6 Hz / milliohm. Note that the resistance of one inch of 22 gauge wire is 1.34 milliohms.
Use
The circuit will operate with a battery voltage between 7 VDC and 9 VDC. The milliohmmeter’s frequency is slightly dependent on the supply voltage. This is not a problem because we are interested in the change of oscillation frequency, not the value. The device draws an average current of 75 milliamps. A 9V alkaline manganese-dioxide battery should last for about three hours. When making measurements, the test leads must be in good contact with the resistance under test. Otherwise, the output frequency will be scratchy. One way to avoid this is to file the tips of the test probes to a sharp point as this will allow better contact with PCB traces.
The “just noticeable difference” for frequencies measures how easy it is to determine one frequency from another.
I obtained the following data from the hyperphysics.phy website:
| Frequency |
Just noticeable difference |
| 450 Hz |
1.3 Hz |
| 1,250 Hz |
3.8 Hz |
| 2,060 Hz |
6 Hz |
PARTS_LIST.doc
Have fun building and using your Audible Milliohmmeter! NV


Comments


