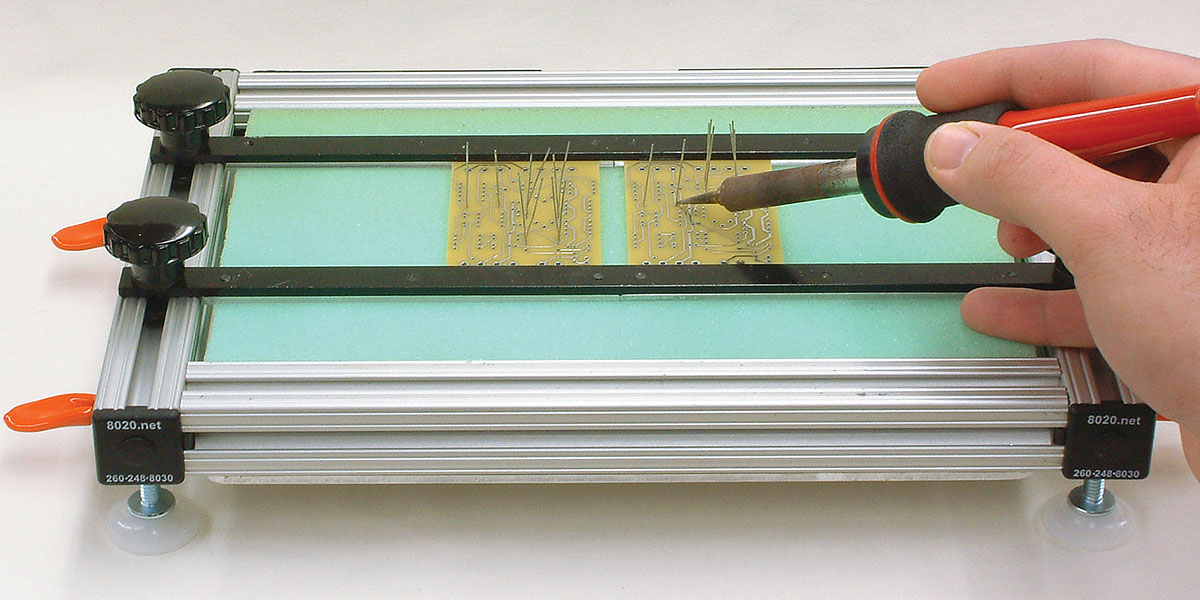
I spend a considerable amount of time assembling and soldering circuit boards for my profession, as well as a hobby. One of my biggest frustrations has always been securing the PCB in such a way that it cannot move or vibrate, but still allows plenty of access for the soldering iron. Over the years, I have purchased — and been disappointed with — various types of circuit board vises and fixtures. The ubiquitous “third hand” gripper was too flimsy. Others had jaws specifically for circuit boards, but I found them to be too deep or improperly sized. Most could not hold more than one PCB at a time. And there was one feature in particular that I was looking for: a reliable way to hold through-hole components in place, upside down, while I soldered on the other side of the board. This article describes my solution.
THE DESIGN
I loosely based my design on photos I had seen of professional circuit board reworking equipment (costing in the hundreds or even thousands of dollars). These systems use a piece of soft foam rubber to hold components in place, allowing soldering work to be done on the opposite side. I decided to use T-slotted extruded aluminum for the jig frame, from 80/20, Inc. (www.8020.net). The T-slot system is very versatile, as T-nuts can be used to mount components at any location on any of the four sides.
Two notched rails were fabricated which capture the circuit board(s) and can be adjusted as necessary in the T-slots. The foam is attached to a backer plate which is inserted through the opposite side of the jig and applies slight pressure to the circuit board. Knowing that this foam would be installed and removed frequently, I chose to use quick-release toggle clamps to hold it in place.
After trying out the jig with several different PCBs, I found that certain large or odd-sized components had to be manually held in place while being soldered. This proved difficult since the parts are normally underneath the jig during soldering. My solution was to install two strips to the front of the jig using T-nuts which are normally parallel to the extrusion, but can be rotated 90 degrees to provide an extra set of feet. The jig can then be set on its side, allowing access to both sides of the circuit board. Figure 1 shows the jig in this setup.
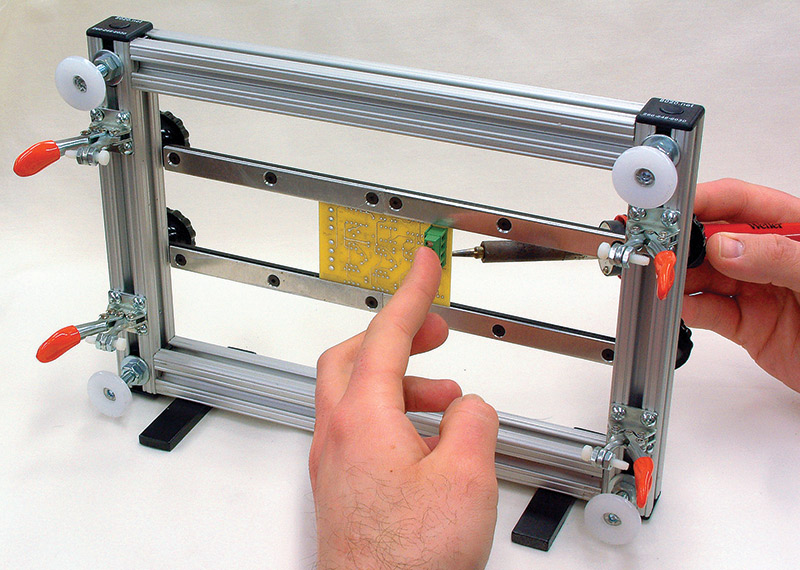
FIGURE 1. The completed assembly jig, with side supports in use.
FABRICATION and ASSEMBLY
Most of the components were purchased from McMaster-Carr (www.mcmaster.com); refer to Table 1 and the assembly drawings in Figure 2.
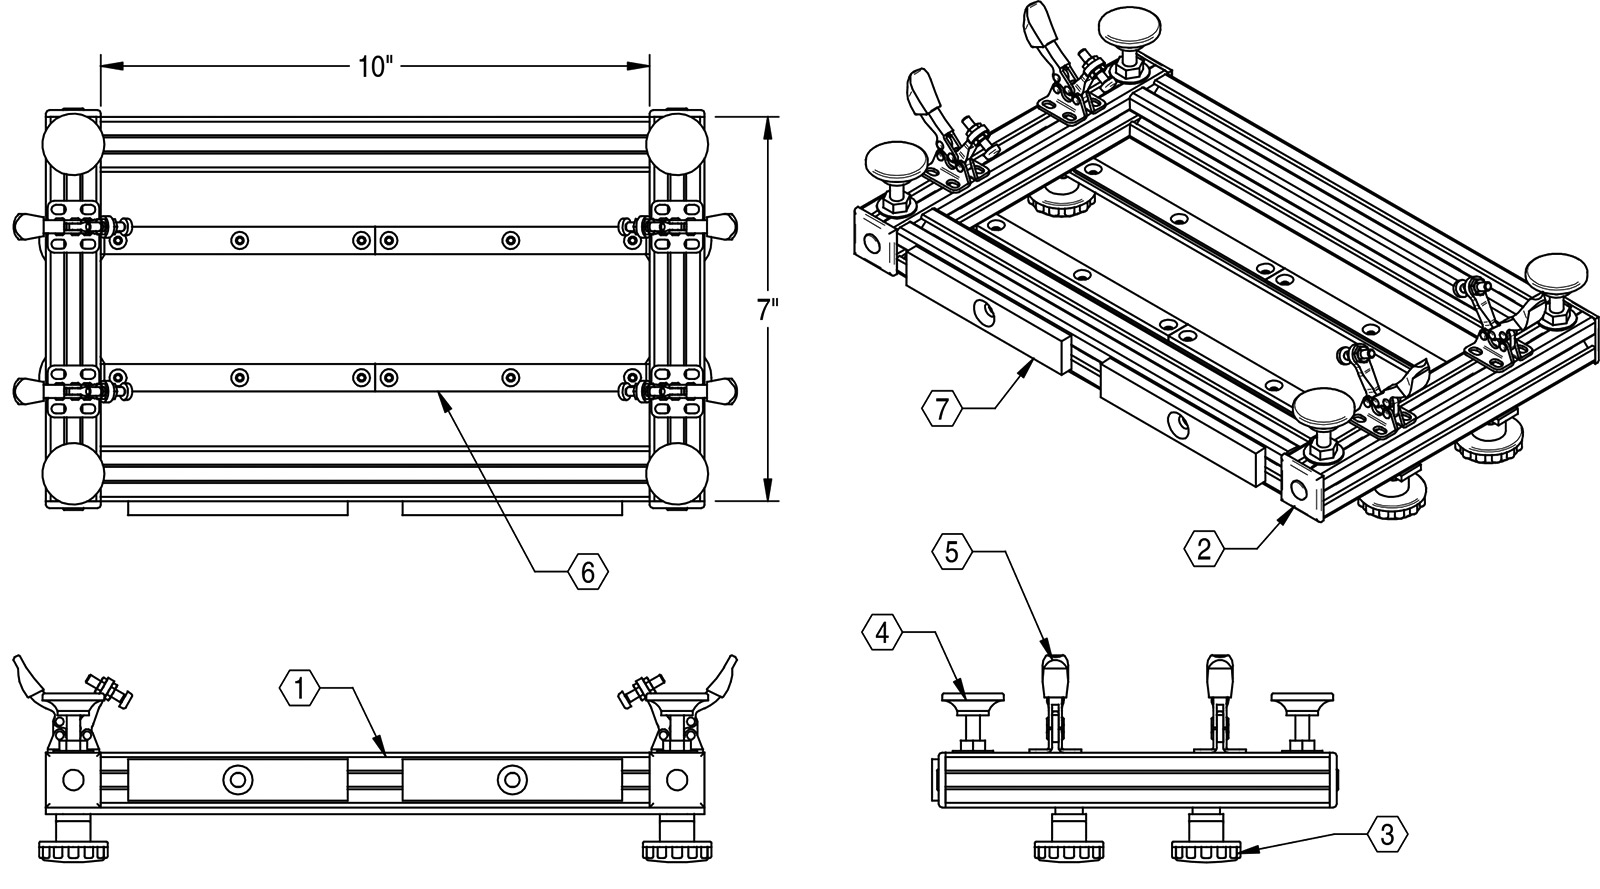
FIGURE 2. Assembly detail; see Table 1 for component identification. (Bottom side shown facing up for clarity.)
| ITEM |
DESCRIPTION |
QTY |
MFR P/N |
DIST P/N |
| 1 |
Aluminum T-slot extrusion
T-nut, 1/4"-20 thread
Extrusion connector |
2
10
4 |
80/20 #1010
80/20 #3382
80/20 #3381 |
McMaster 47065T209 (2' length)
McMaster 47065T142 (4/pkg)
McMaster 47065T155 |
| 2 |
Extrusion end cap (optional) |
4 |
80/20 #2015 |
McMaster 47065T91 |
| 3 |
Knob w/ threaded stud |
4 |
N/A |
McMaster 6479K88 |
| 4 |
Leveling mount |
4 |
N/A |
McMaster 23015T82 (12/pkg) |
| 5 |
Toggle clamp |
4 |
Fargoware FC-20
De-Sta-Co 205-S
Carr-Lane CL-150-HTC |
MSC Industrial 76988120
www.mscdirect.com
(Also available on eBay) |
| 6 |
Board support rail (see Figure 4) |
2 |
|
|
| 7 |
Side support (see Figure 5)
Foam compression plate (see Figure 6) |
2
1 |
|
|
TABLE 1. Master Parts List.
Locally available common parts — such as fasteners and aluminum bar stock — are not included in the list. The only special tools required for construction are thread-cutting taps of several different sizes, and the corresponding tap drills. The part numbers shown in Table 2 are for spiral point taps, a.k.a., “gun taps,” which can be used in a reversing power drill or drill press.
| Thread Size |
Tap P/N |
Drill P/N |
| #6-32 |
2523A446 |
2930A49 |
| #8-32 |
2523A447 |
2930A42 |
| 1/4"-20 |
2523A411 |
2930A17 |
TABLE 2. McMaster part numbers for required taps and tap drills.
First, cut the extrusions to length as indicated. A hacksaw cut would be sufficient, but most power miter saws can cut aluminum and provide a much cleaner result. In order to assemble the frame using the extrusion connectors, the ends of the 10” pieces need to be threaded 1/4”-20. The hole through the center of the extrusion is already the proper diameter to be tapped this size. Figure 3 shows the usage of the extrusion connector; 1/4” diameter holes should be drilled 1/2” from the ends of the non-tapped extrusions to provide access for a 5/32” hex wrench to tighten the connector.
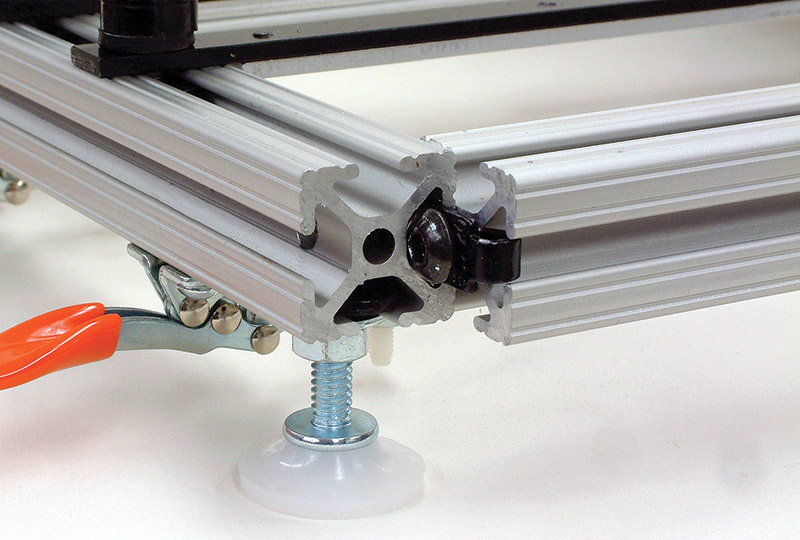
FIGURE 3. Installing the extrusion connector.
Note that the T-nuts must be inserted before the frame is assembled: four on the top side for the knobs; four on the bottom side for the feet; and two on the front side for the rotating side supports. Plastic end caps are available which cover the exposed ends of the extrusion, mainly for cosmetic purposes.
The leveling feet and toggle clamps can be attached to the bottom side once the frame is assembled. Install a washer and nut onto each foot stud before threading it into the T-nut; this will allow the feet to be adjusted individually so that the jig sits flat on your work surface. The mounting holes in the toggle clamps don’t line up with the T-slot, so they will need to be screwed down. Position each clamp and mark the hole locations, then drill and tap partially through the extrusion for #8-32 thread.
The design of the board support rail can vary depending on the type of equipment you have available to fabricate it. The key feature, of course, is the small cutout where the PCB will fit. The width of this notch depends on the thickness of the circuit boards you will be using, but 1/16” (0.063”) is the most common size.
An important design point for me was making the depth of the notch as shallow as possible, since I often work with boards that have components mounted almost to the very edge. I have access to a milling machine, so I chose to fabricate each support rail from two sections of 1/8” x 1/2” aluminum sandwiched together (see Figure 4).
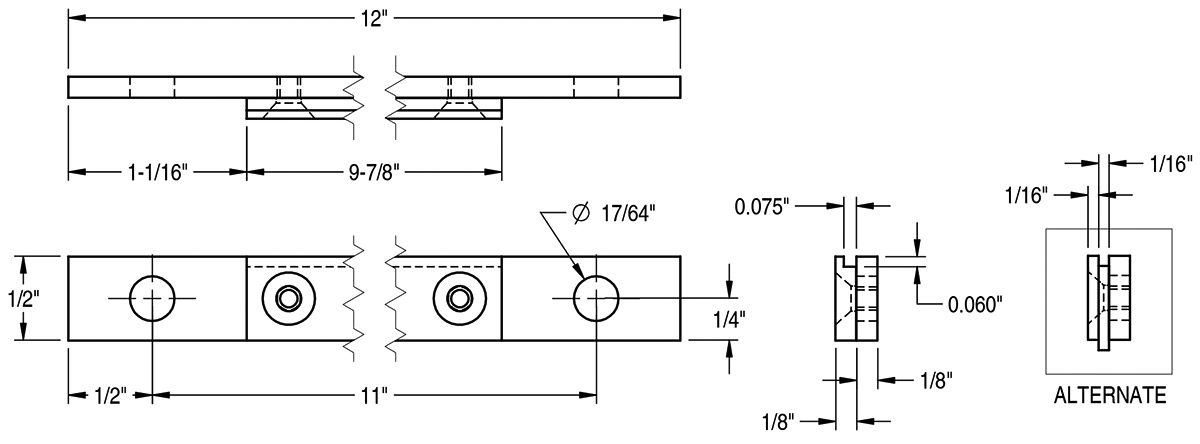
FIGURE 4. Board support rail detail.
The notched component ended up being two identical pieces butted end-to-end, as this made the machining easier. To attach the sections, clamp them together and drill a number of pilot holes (I used six; four would be sufficient). Separate the sections, then countersink the holes in the notched piece(s) and thread the other holes for #6-32 thread.
Figure 4 also shows an end view of an alternative method for constructing the support rail, with no milling required. Replace the notched section with two pieces of 1/16” x 1/2” aluminum. Clamp everything together with the center section offset to create a cavity for the PCB edge, then drill and tap as described previously. It may be necessary to add a thin shim between two of the sections in order for a 1/16” thick board to slide easily.
Once the support rails are complete, they can be attached to T-nuts on the top of the jig using the threaded knobs. If you use the knobs specified in Table 1, add a few washers to each stud before assembly. (Otherwise, the knob will contact the bottom of the T-slot before it tightens against the support rail.) Alternatively, you could cut approximately 1/8” off the end of each stud.
Refer to Figure 5 for dimensions of the side supports. I used aluminum, but any sturdy material will do.

FIGURE 5. Side support detail.
The exact dimensions aren’t critical, but the piece must be thick enough to fully countersink a 1/4” flat head screw. I applied a few self-adhesive rubber furniture feet to each support to keep the jig from sliding around. The foam backer plate can be made from any thin sturdy material (I used 1/8” aluminum sheet; see Figure 6).
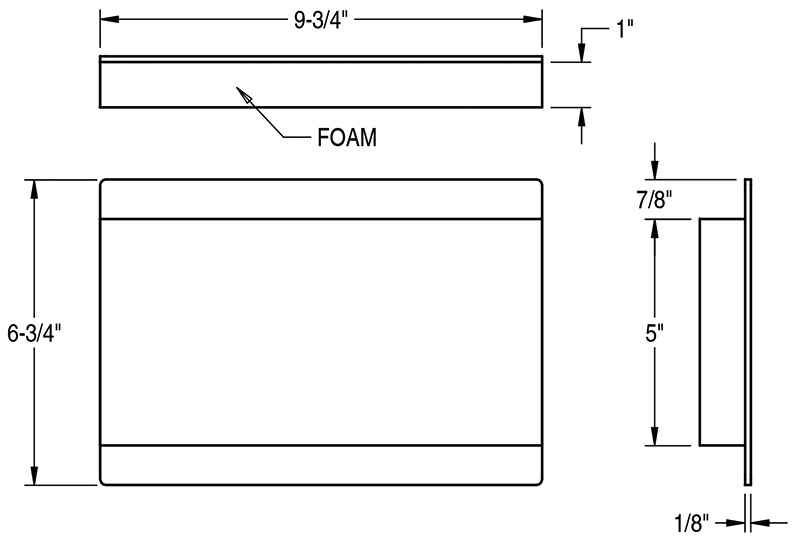
FIGURE 6. Foam compression plate detail.
Depending on the material thickness, the threaded studs on the toggle clamps may need to be adjusted so that they clamp snugly but without excessive force. A piece of 1” thick foam rubber should be sized to fit loosely through the jig frame, approximately 5” x 9.75”. I used inexpensive polyurethane foam — available in sheets from a local craft store — and bonded it to the plate with 3M Super 77 spray adhesive.
USAGE TIPS
The first step in board assembly is to populate the PCB. Generally, components should be installed from smallest (shortest) to largest (tallest). For through-hole components, I find that the foam compression works best for low-profile parts such as resistors, diodes, and DIP ICs. In this case, position the jig with knobs down and install the PCB with the component side facing up as in Figure 7.
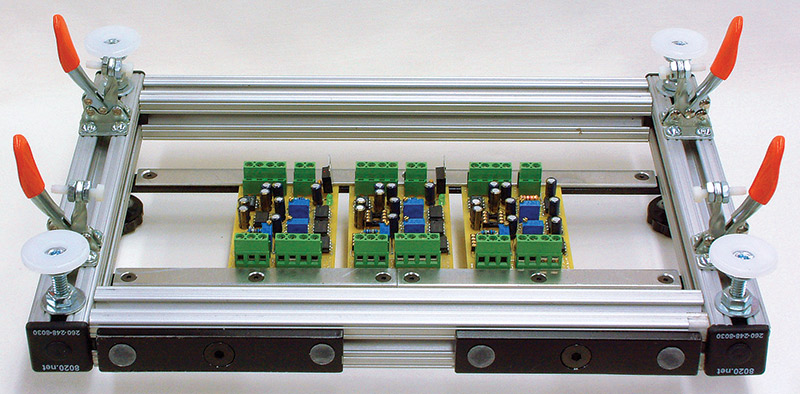
FIGURE 7. Circuit boards in position for component placement.
For maximum strength, the long side of the board should be oriented parallel to the support rails. After placing the components, clamp the foam plate in place and turn the jig over for soldering (see Figure 8).
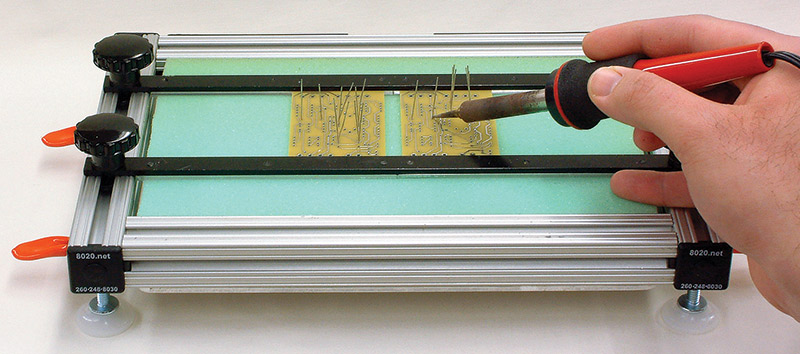
FIGURE 8. Jig oriented for soldering. Note leaded components held in place by foam.
I was initially concerned that heat from the soldering iron would melt the polyurethane foam, but so far this has not been a problem. For larger components, I tend to either use a non-conductive superglue or bend the leads slightly to keep the parts in place while upside down. Glue is also helpful with SMT components, even though placement and soldering is done from the same side.
Some components just don’t work well with any of the aforementioned holding techniques. This was recently the case with a certain terminal block that I was using. It was too large to be clamped with foam, had leads that were too short to bend, and didn’t respond well to superglue. As shown back in Figure 1, the rotating side supports help with these situations. A small amount of solder is first applied to one of the component’s holes in the board. Then, with the component in one hand and the soldering iron in the other, the solder plug is melted as the part is inserted. The other pins can then be soldered as normal.
WHERE TO GO FROM HERE
I spent about $80 on the parts for this jig. To me, it was a very worthwhile expense considering the number of boards I assemble and the quicker workflow that it provides. A hobbyist might find the cost excessive, but it could be built for significantly less depending on your needs.
Probably the most obvious solution would be to reduce the size of the jig. I don’t work on boards that are particularly large, but I wanted the ability to assemble multiple boards at a time — something that many users won’t need. If, for example, the jig frame was reduced to approximately 6” x 8” overall, then only one two-foot piece of aluminum extrusion would be required, and two toggle clamps would likely be sufficient to hold the foam plate in place. The foam could even be eliminated if you work mainly with surface-mount parts or have other ways to hold through-hole components in place.
The versatility of the T-slot system offers many possibilities. Perhaps a miniature gooseneck lamp or magnifier mounted to the soldering side of the jig? One nice feature I noticed on the expensive professional units was a pivoting system — the entire jig could be set on an angle to face the user during soldering or assembly.
Even without all the bells and whistles, I can assure you that having a proper PCB assembly jig goes a long way toward making electronics a more enjoyable hobby. NV
THROUGH-HOLE VS. SURFACE-MOUNT
Surface-mount technology (SMT) has slowly replaced traditional through-hole designs for many components. It offers the advantage a of reduced footprint resulting in higher circuit density, and is more conducive to automated assembly and soldering. Through-hole technology remains in use mainly for higher powered components and those which require mechanical stability through the solder joint. It also lends itself well to hand soldering and prototyping. The jig described in this article can be used in several different orientations and streamlines PCB assembly with either type of component.

