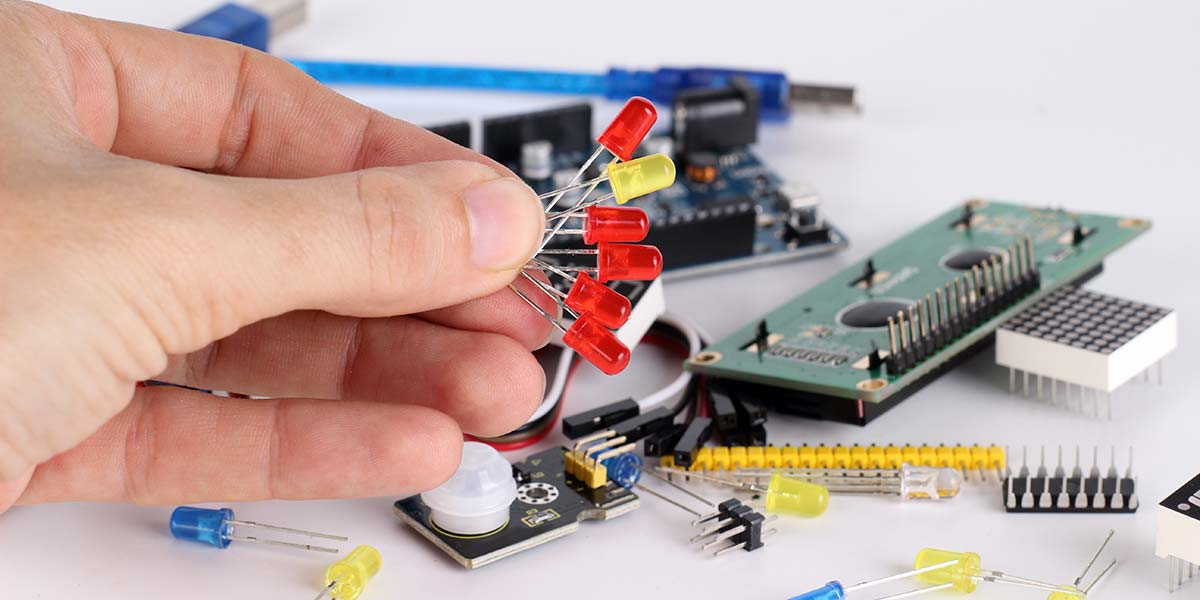
One of the first experiments people learning about microcontrollers usually perform is how to control an LED. Typically, they hook up an LED in series with a current-limiting resistor, connect it to an output pin, and write some simple software to make it blink. The Arduino blink sketch shown below is an example:
int led = 13;
// the setup routine runs once before the loop() function
void setup() {
// initialize the digital pin as an output.
pinMode(led, OUTPUT);
}
// the loop routine runs over and over again forever:
void loop() {
digitalWrite(led, HIGH); // turn the LED on (HIGH is the voltage level)
delay(1000); // wait for a second
digitalWrite(led, LOW); // turn the LED off by making the voltage LOW
delay(1000); // wait for a second
}
On Arduinos, there is an LED and current-limiting resistor on board already (and connected to pin 13), so there is nothing really to hook up for this first experiment. Once this sketch is downloaded onto your Arduino, you should see the onboard LED blink on and off until power is removed.
As you might expect, the thrill of watching the LED blink wears off pretty quickly. Next, people might want to try and control the brightness of an LED with software.
The following Arduino fade sketch causes the LED connected to pin 9 through, say, a 470 ohm resistor to ground, to go from off to full brightness and then back down, over and over:
int led = 9; // the pin that the LED is attached to
int brightness = 0; // how bright the LED is
int fadeAmount = 5; // how many points to fade the LED by
// the setup routine runs once before the loop() function
void setup() {
// declare pin 9 to be an output:
pinMode(led, OUTPUT);
}
// the loop routine runs over and over again forever:
void loop() {
// set the brightness of pin 9:
analogWrite(led, brightness);
// change the brightness for next time through the loop:
brightness = brightness + fadeAmount;
// reverse the direction of the fading at the ends of the fade:
if (brightness == 0 || brightness == 255) {
fadeAmount = -fadeAmount ;
}
// wait for 30 milliseconds to see the dimming effect
delay(30);
}
In this sketch, an analogWrite statement is used to control LED brightness instead of the I command used to turn the LED off and on as in the previous sketch. Brightness control works using a combination of persistence of vision coupled with Pulse Width Modulation, or PWM for short.
Persistence of vision is an effect where our eyes and brain hold onto an image we see for approximately 1/25th of a second before it fades away. We all experience this effect at the movies where we fail to notice that a motion picture screen is actually dark about half the time. Motion pictures project one new frame every 1/24th of a second. Each frame is shown three times during this period. Our eyes retain the image of each frame long enough to give us the illusion of smooth motion. How does this relate to LED brightness? Glad you asked.
An LED — being a semiconductor device — can be switched on and off very quickly. An LED is at full brightness when it's on all of the time over a fixed period of time. If the LED is only on half of the same time period (and off the other half of the time period) and the time period is very short, it will appear approximately half as bright. Now, if this switching happens at a fast enough rate, our persistence of vision will not perceive the LED as being turned on and off or flickering, but will perceive it as being on at some brightness level.
PWM divides up the periodic time period into intervals based on the resolution of the hardware. On most eight-bit microcontrollers, eight-bit PWM is supported. This means that there are 256 unique durations from always off to always on. Duty cycle is defined as the ratio of on to off times. A PWM output that is on half of the time has a 50% duty cycle.
Figure 1 illustrates various duty cycles of a PWM output.
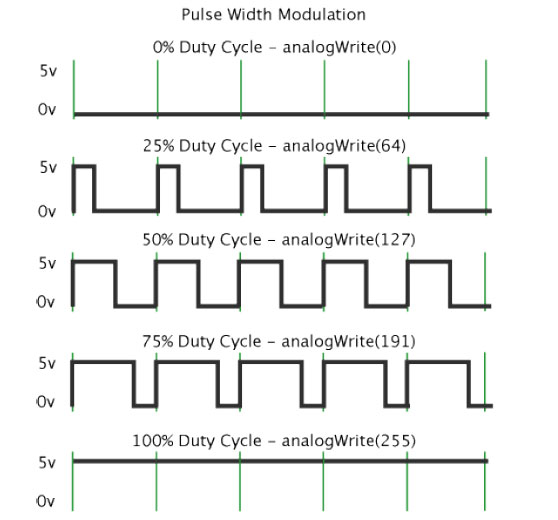
FIGURE 1. Pulse width modulation and duty cycles.
The green lines in this figure show the periodic nature of the PWM output. If a PWM output is used to control LED brightness, the frequency of the PWM output becomes important. Flickering of the LED will be visible if the PWM frequency is too low. Most — if not all — microcontrollers allow the frequency of their PWM outputs to be configured.
The analogWrite function in the previous sketch sets how long the PWM output connected to the LED is on; analogWrite(0) means the output is never on and the LED is dark; analogWrite(255) means the PWM output is always on, so the LED is at full brightness. Values between 0 and 255 determine the relative brightness of the connected LED.
We should quickly say a few words about current-limiting with LEDs. Current limiting is important to protect both the digital output of the controller driving the LED and the LED itself from burning out. To figure out the value of a current-limiting resistor to use with an LED requires three pieces of information. First, the supply voltage used to drive the LED (Vs); second, the current (I) you want to operate your LED at; and third, the forward voltage (Vf) drop of the LED. Forward voltage varies by the color of the LED. A red LED typically drops 1.8 volts whereas a blue LED may drop 3.3 volts.
As an example, assume our supply voltage is five volts; assume we want 20 mA (0.02 amps) of current for the LED, and the voltage drop across the LED is 1.8 volts. Using Ohm's Law, we can calculate the required resistance with the formula:
R = (Vs - Vf) / I
which works out to be around 160 ohms. If the resistor value you calculate turns out not to be a standard value, pick the next larger value to be safe.
Okay, so now we see how the brightness of an LED can be controlled using PWM. With this information, you could control the brightness of a red, green, blue, or any single color LED with software. What if you want variable color output from an LED?
In this case, you would probably choose an RGB LED for this purpose. RGB LEDs actually contain red, green, and blue LEDs internally. This means three PWM channels would need to be used to control the brightness and the color of a single RGB LED.
By varying the duty cycle of each of the LEDs inside the RGB LED, many color combinations are possible. If eight-bit PWM is used on all three channels driving an RGB LED, there are theoretically 256 x 256 x 256, or over 16 million possible color combinations.
Research has shown the human eye can discern approximately seven million unique colors.
On most Arduino boards (those with the ATmega168 or ATmega328), PWM is available on pins 3, 5, 6, 9, 10, and 11. On the Arduino Mega, it works on pins 2-13 and 44-46. Older Arduino boards with an ATmega8 only support PWM on pins 9, 10, and 11. On the Teensy 3.1 microcontroller that I typically use, PWM is available on pins 3, 4, 5, 6, 9, 10, 20, 21, 22, 23, 25, and 32.
So, as you can see, on typical microcontrollers there are only a small number of PWM outputs available for driving LEDs. If you only want to drive single color LEDs, you may be okay, but if you want to drive a large number of RGB LEDs the outlook is bleak.
There are many options available for driving larger numbers of LEDs using hardware external to but controlled by a microcontroller. If you search the Internet, you will see many examples. Many designs use 74HC595 shift register chips to drive the LEDs, but my current solution of choice is the Adafruit 24-channel 12-bit PWM LED driver with SPI interface (product #1429; available for $14.95). With its 24 channels, you can control 24 single color LEDs or eight RGB LEDs with the added advantage of 12-bit PWM, giving finer grain control than the eight-bit PWM described previously.
An additional advantage is that each PWM output provides constant current, so current-limiting resistors are unnecessary. In fact, one resistor on this driver board controls the current through all channels which is set at the factory to 15 mA. Up to 30 mA of drive current per channel is possible by changing the resistor. NOTE: This device is a current sink. It sinks current to ground; it cannot source current.
The Adafruit device is really just a breakout board for the TLC5947 controller chip from TI. This breakout board makes all of the TLC5947 signals available in an easy-to-use configuration without having to deal with surface-mount components.
The TLC5947 chip is a cascadable shift register with built-in PWM counters and PWM oscillator. Since each output requires 12 bits of information to control its PWM hardware, a total of 288 bits or 36 bytes of data must be streamed into the chip via SPI to control its 24 PWM outputs. (More on how to control the TLC5947 chip in the software section).
For many of my projects, a single Adafruit driver board still doesn't have enough outputs to drive large numbers of RGB LEDs. I recently purchased some 8x8 RGB LED matrices for use in a project. Think about it. This is a matrix of 64 RGB LEDs which equates to 64 x 3, or 192 individual LEDs needing PWM control.
There were two ways to go about this project. Purchase and connect eight of these boards together somehow so each board controls one row of the display for a total driver cost of $119.60. Or, use one of these boards, eight cheap P channel power MOSFETs and some clever software to control the entire display.
Being frugal, I chose the latter. In the discussion to follow, I will show you how to use multiplexing of the LED driver to accomplish this feat.
Multiplexing
Multiplexing is a term from the telecom industry which meant to combine multiple channels of data onto a single medium for transmission. Multiplexing reduces the cost of hardware, and because of a reduced parts count increases reliability.
Multiplexing many channels of data onto a single medium required that each channel of data be given its own time slot. This is referred to as TDM, or Time Domain Multiplexing. We can use this same technique for controlling our LED matrix by assigning each row of the display a different time slot for update. If we update each row of RGB LEDs fast enough, persistence of vision will make it appear that each LED is individually controlled.
I designed some hardware to demonstrate control of an 8x8 RGB LED matrix using multiplexing. The hardware is shown in Figure 2 and the hardware's schematic is shown in Figure 3.
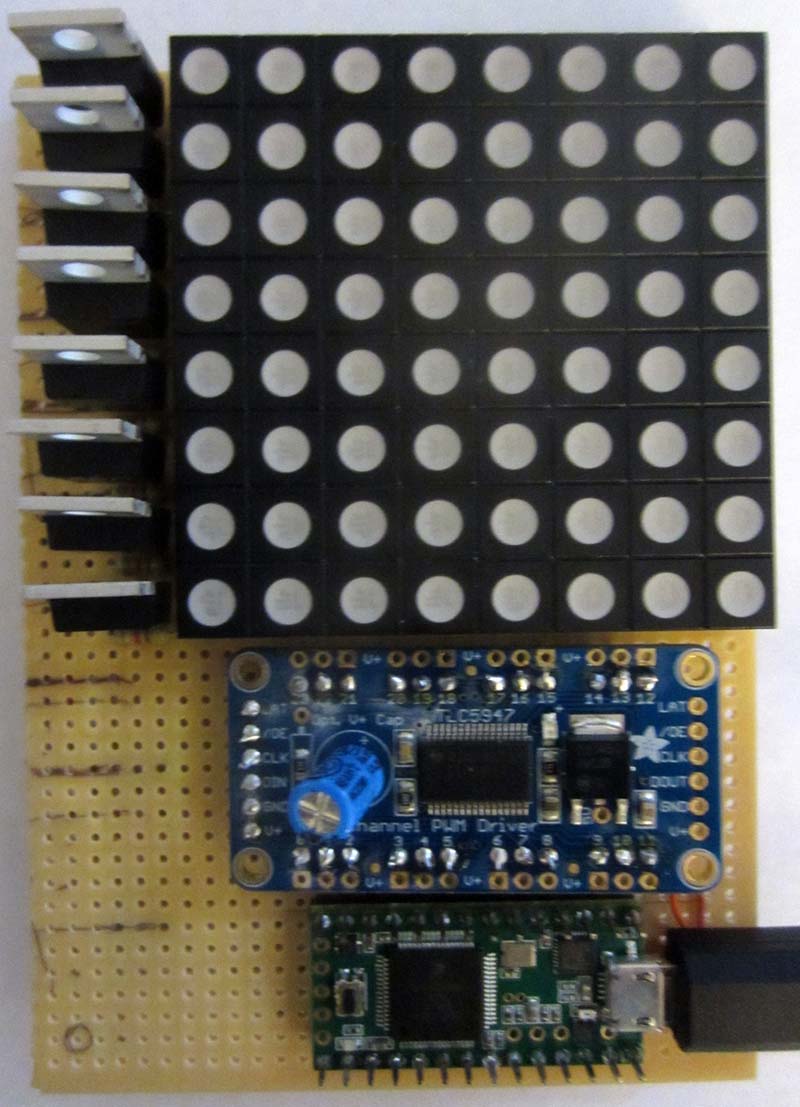
FIGURE 2. The demonstration hardware.
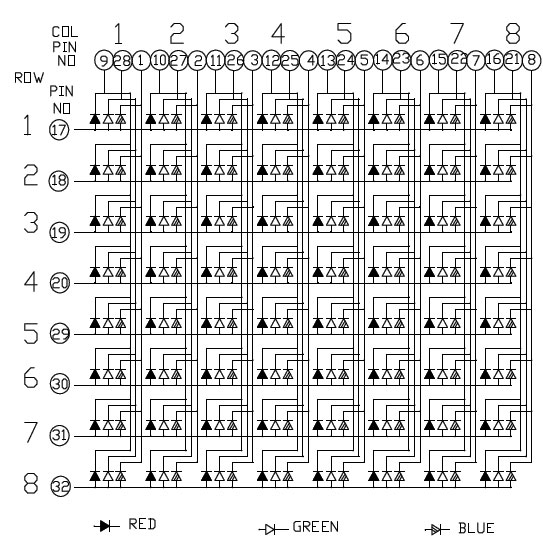
FIGURE 3. Demonstration hardware schematic.
The Demonstration Hardware
The 8x8 RGB LED matrix I will control is of the common anode variety. What this means is that each row of the display has the anodes of each red, green, and blue LED connected together (see Figure 4).
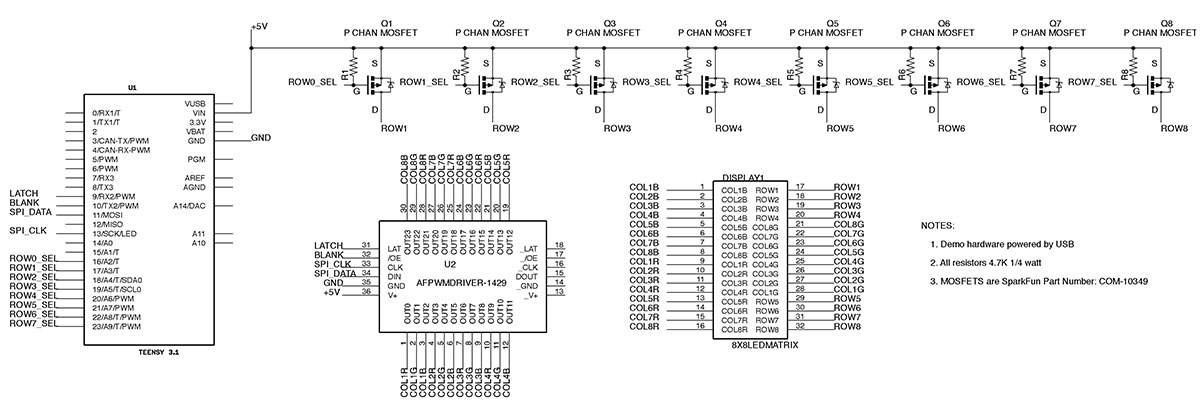
FIGURE 4. Common anode RGB LED matrix schematic.
The cathodes of each column of the same color LEDs are also connected together and brought out to pins on the matrix. By applying a current source to a specific row pin and a current sink to a specific cathode pin, a single color LED can be illuminated.
I tested the LED matrix I built into the demonstration hardware using a nine volt battery and a 1K ohm resistor by connecting the + side of the battery through the resistor to a row pin, and connecting the - side of the battery to the various column pins. As you move the battery connection from one column pin to another, you will see the LEDs change color.
As mentioned, in the demonstration hardware, P channel MOSFETs are used as the current source for each row of the matrix. The current flowing from the drain of the device into the row of LEDs is controlled by the voltage applied to the gate of the MOSFET.
As wired, current flows to the LEDs in the row if the gate is driven low by the Teensy 3.1 controller. If the gate is pulled up to the voltage at the MOSFET's source pin, current flow stops. Each row MOSFET is connected to a different pin on the Teensy so that each can be individually controlled.
The current sink side of the equation is handled by the TLC5947 chip on the Adafruit board. The 24 PWM channels provided by the chip are connected to the 24 color column pins of the LED matrix. The data used to control the PWM outputs is streamed serially into the TLC5947 chip via the SPI interface on the Teensy controller. A data and a clock line are used to move the data which flows in one direction only.
Two other signals are needed for control of the TLC5947 chip. The first is labeled /OE on the Adafruit board, but called BLANK on the chip itself. When BLANK is high, all of the PWM channels stop sinking current and the chip's internal PWM counters are reset to zero. When BLANK goes back low, the current sinks are enabled and the PWM counters start counting.
The second control signal is labeled LAT on the Adafruit board but called XLAT on the chip. The rising edge of this signal causes the data contained in the TCL5947's shift register (loaded via SPI) to be transferred to the individual PWM counters backing each output pin.
I used a Teensy 3.1 controller from pjrc.com for controlling the hardware. It has plenty of RAM and Flash memory for coding up any kind of display patterns you can envision. The Teensy is Arduino compatible via the Teensyduino software available at the website.
The hardware works as follows (under control of the software which will be described next): Data for a row of LEDs is moved from the controller to the TLC5947 chip using SPI. The data is latched into the chip on the rising edge of XLAT, and then the appropriate row select output is brought low to enable the LEDs in the row. Next, the BLANK line is driven low which causes the PWM counters to start and the LEDs in the selected row to illuminate. After a precise period of time, data for the next row is loaded and the whole process repeats indefinitely.
The Demonstration Software
The software running on the Teensy 3.1 controller is what makes multiplexing of the LED matrix possible. Multiplexing makes the hardware simpler, but the software more complex. The demonstration software sketch is available in the article downloads if you would like to duplicate what I have done or use pieces of the software in projects of your own. The sketch requires the TimerOne and the spi4teensy3 libraries to be available in your Arduino build environment. Please refer to the LEDMatrix8x8.ino sketch for the discussion that follows.
The first order of business in the sketch is to define the control signals/pins of the Teensy controller which will control the TLC5947 chip. The assignments are as follows:
// PWM driver control pins
#define LATCH_PIN 9
#define BLANK_PIN 10
// LED Matrix row select pins
#define ROW0_PIN 16
#define ROW1_PIN 17
#define ROW2_PIN 18
#define ROW3_PIN 19
#define ROW4_PIN 20
#define ROW5_PIN 21
#define ROW6_PIN 22
#define ROW7_PIN 23
An interrupt on the Teensy 3.1 controller is used to generate the precise timing required to make multiplexing work. The three values below define interrupt timing:
// Interrupt period calculations
#define DATA_XFER_TIME_USEC 13
#define ROW_DISPLAY_TIME_USEC 1024
#define INTERRUPT_TIME_USEC (DATA_XFER_TIME_USEC + ROW_DISPLAY_TIME_USEC)
DATA_XFER_TIME_USEC is the time in microseconds it takes for the spi4teensy3 library to transfer 36 bytes of row data from the Teensy running at 96 MHz to the TLC5947. The ROW_DISPLAY_TIME_USEC is a little more difficult to describe.
It's the time it takes the TLC5947 PWM counters to count from zero to 4095, thereby completing the 12-bit PWM cycle. The PWM oscillator internal to the TLC5947 runs at 4 MHz under normal operating conditions. The period of the 4 MHz oscillator times 4,096 equals 1,024 microseconds.
Since both of these processes must occur for every row of the LED matrix data, the total time between interrupts is their sum. The TimerOne library is used to cause a periodic interrupt at this frequency.
Finally, we define the frame buffer which contains the data used to drive the complete LED matrix:
// Frame buffer definition
#define NUMBER_OF_ROWS 8
#define BYTES_PER_ROW 36
// Frame buffer is 2D array of bytes
byte frameBuffer[NUMBER_OF_ROWS][BYTES_PER_ROW];
Foreground code in a sketch would put data into the frame buffer that represents the pattern to be displayed, and the background code contained in the interrupt service routine (ISR) moves the data from the frame buffer to the hardware continuously. The LED matrix is updated around 122 times per second by the ISR.
From the foreground's code perspective, it just sets pixels to specific colors and these colors magically appear on the LED matrix. It is not necessary to call any kind of show function to force a display update; it all happens automatically and in real time.
With this understanding, most of the code in the sketch should now be self-explanatory. As a demo, I coded a scrolling "Nuts and Volts" text message and a swirling rainbow pattern which alternate. If you build the demonstration hardware and run this sketch, you will see a bright vibrant display without any flicker whatsoever.
Going Further Yet
The demonstration hardware can control 64 RGB LEDs or 192 single color LEDs. If this is still insufficient, it should be possible to add up to eight additional rows of LEDs.
It's also possible to chain TLC5947 chips. Sixteen rows of LEDs combined with two TLC chips would bring the total RGB LED count to 256 with a refresh rate of approximately 60 frames per second. Not too shabby for such a small amount of hardware. NV
Parts List
| Qty |
Part |
Description |
Source |
| 1 |
Display 1 |
Common anode 8x8 RGB LED matrix |
eBay |
| 1 |
U2 |
24-channel PWM controller |
Adafruit |
| 1 |
U1 |
Teensy 3.1/3.2 controller |
PJRC |
| 8 |
R1-R8 |
4.7K 1/4 watt resistor |
RadioShack |
| 8 |
Q1-Q8 |
P channel power MOSFETs |
SparkFun |
| 1 |
|
Breadboard |
RadioShack |
| 1 |
|
USB cable with five-pin micro-B plug
for connecting Teensy to a computer
or USB power supply |
PJRC |
| 1 |
|
Optional USB power supply capable of at least 1A @ 5V |
RadioShack |

