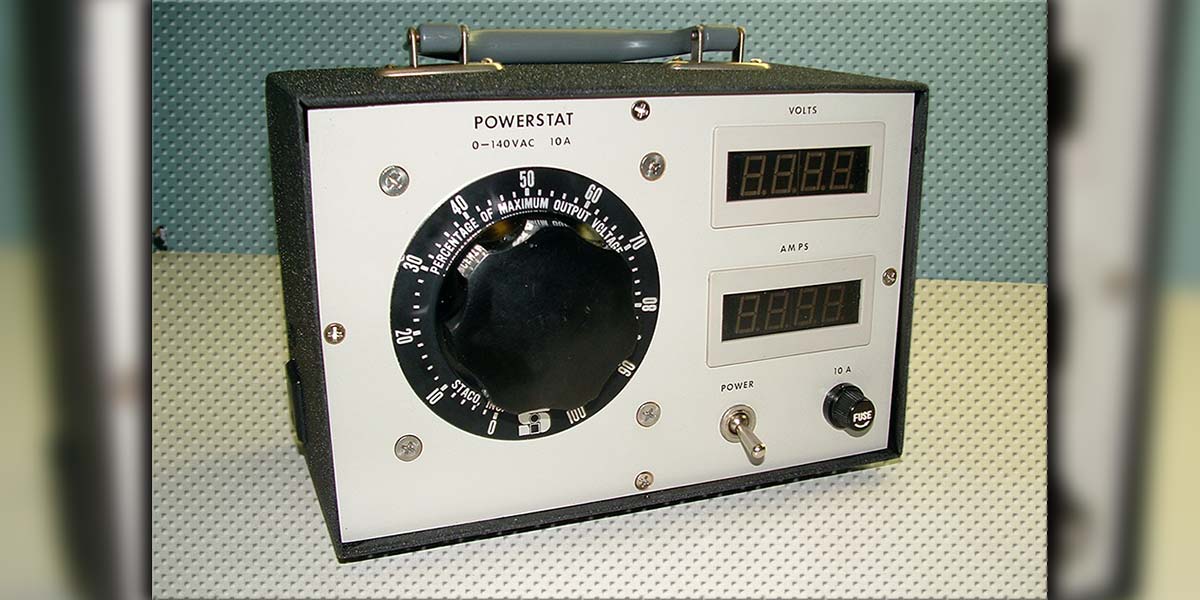
For several years, I have needed to use a variac for various bench testing. Up until recently, my barebones test setup consisted of a two amp variac, a DMM, and a collection of test/jumper leads. To perform tests in this manner, it was awkward to say the least. Common scenario: Measure the variac’s set voltage, connect load, disconnect DMM and change leads for current measurement, reconnect everything, and hook up to load. Then, when any change was needed or performed, it was swapping leads back and forth again. You can imagine that after a while, a “rats nest” of twisted, jumbled meter leads and jumper leads were all over the place — quite annoying!
Then, one evening when I inadvertently connected the wrong end of this test lead to the wrong end of that jumper lead, the whole project went up in smoke! It was at that point I said “enough” and set out to forever correct this messy situation. Since deluxe versions of these variacs can run $500 and up, I just could not afford or justify buying a new one. However, I was sure I could build one a lot cheaper and that’s what this article is all about.
For starters, that pile of leads and even the DMM had to go. Also, I wanted more power than my little two amp unit would put out. What I envisioned was the smallest enclosure with the largest practical variac that I could cram into it. I also wanted simultaneous voltage and current metering. One NEMA standard three prong outlet, along with a power on switch, and fused both on the input and output would do the trick. In other words, a moderately small unit that would sit out of the way in a corner of my test bench and yet perform all the functions of my “20 jumper lead” setup.
For some of you not familiar with these devices, you may be asking ‘what is a variac and why would I want one?’ A variac (as used in this article) is a single winding transformer — more properly known as an auto-transformer — with a movable tap or slider to vary the output voltage as opposed to a fixed input voltage. These devices (which have been around for over 70 years) look like something right out of Thomas Edison’s laboratory. They have remained virtually unchanged in all that time which gives testimony to their simplicity and ruggedness of design. The unit is shown schematically in Figure 1 and pictorially in Figure 2.
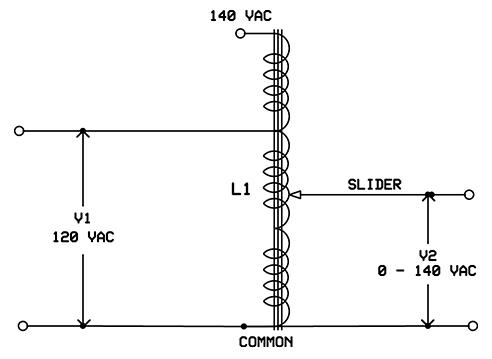
FIGURE 1. Auto-transformer
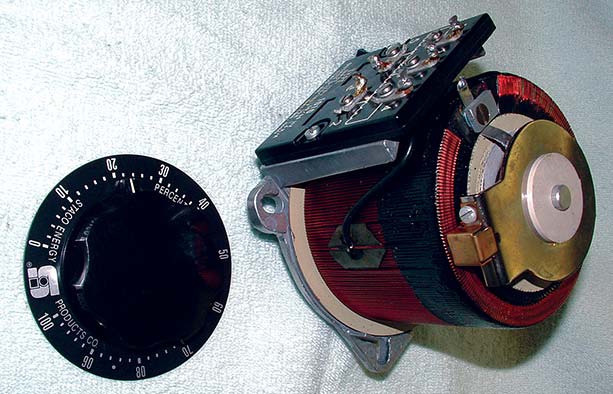
FIGURE 2. Bare bones variac
The input (V1) at usually 120 VAC impresses a voltage across the single total winding of L1. The coil will reach a potential of 140 VAC at its upper end. This is because the coil is wound on a common core — a hollow iron cylinder with a flatted area of bare exposed wire on the top surface called the commutator. The slider is a spring-loaded carbon brush attached to a central shaft, and when rotated around this commutator, picks off a variable output voltage (V2) of 0 to 140 volts. This action is almost identical to the mechanics of a standard potentiometer.
The position of the slider now forms a transformer which — for all practical purposes — follows all the rules of an isolation transformer: volts x amps in equals volts x amps out. In other words, the “secondary” step up/step down voltage will always be rated at a current (up to the maximum name plate rating) that produces the same wattage as the rated incoming “primary” wattage.
The term “VARIAC” ( VARIable AC) was coined by the General Radio Corp. back in the 1930s and although they no longer manufacture these devices, the name stuck and is synonymous even today with a variable auto-transformer. Today, Superior Electric and Staco, Inc., make most of these devices. Superior’s trademark is the “PowerStat.” The PowerStat has become as popular as the variac when identifying these devices and is used interchangeably when referring to variable auto-transformers.
Although you probably won’t use one of these as much as more common test equipment (such as a DMM), when the need arises, they are indispensable. I’ve used my variac for transformer testing, initial power-up of new power supply designs, regulator vs. line voltage tests, as various AC voltage sources, and all the way up to power tool testing. But that only touches the tip of the iceberg, and I could go on and on about its uses. Initially, when designing this unit, I decided that a 10 amp variac would be the best compromise between power and manageable size of the finished product.
This has proven to be a good choice over the last couple years since I built it, as I have used it for testing low milliamp devices all the way up to three horsepower woodworking routers (speed control design). Even though the name plate rating is 10 amps, it can put out considerably more current for short time intervals (10-15 minutes). I have driven 15+ amp devices for time periods such as that. It all comes down to duty cycle and starting with a cold core, then adequate cooling time between these high current runs.
Construction
To start off this project, the first item to purchase is a bare bones variac unit (no case or accessories). Of course, eBay was the place to look for one. The unit I chose was a Staco #1010. They just seem to have a steady stream of these for sale. The average selling price of these units ranges between $35 to $55. As it was, I got mine for $25 and the seller even threw in a small 1.75 amp unit. Figure 2 is typical of these 10 amp units. The type with it sitting on its front face with the dial plate removed is what you want to look for. You can always ‘Google’ for exact model information, including detailed mechanical drawings plus a ton of general information. Now that the most expensive part is out of the way, the next step is to locate an enclosure to house this unit, a couple of digital panel meters, circuit board, power supply, and various hardware.
Fortunately, I had a metal box out in the garage that — with the right shoehorn — I could cram all the parts into (I have a habit of filling a 5 lb bag with 10 lbs of parts). I needed to make a vented back panel, so I used some scrap Bakelite sheeting I had and then I fashioned a 1/8’ aluminum front panel that was adequate to hold the weight of the variac. I screwed on a handle and some bumper feet that I scrounged from my junk box and I was all set. I gave it a fresh coat of paint then picked up the rest of the hardware and associated panel meters that I needed. Since I knew the internal circuit board and its power supply board would be quite small, I just allowed about 10-12 cubic inches of space to fit those in later.
The box I used measures 9” wide x 6” high x 5” deep. Do not go any smaller than this if you use a 10 amp variac. In fact, bigger is better. Of course, if you use a smaller variac, just reduce the enclosure accordingly. Once you have all the major components set out in front of you on your workbench, you can then best determine your layout and enclosure size. Remember, nothing is engraved in stone here, so as I describe how I constructed my unit, I’ll offer a few options along the way.
Referring to Figures 2 and 3, notice the four ears slightly protruding at the front end (dial knob end). Lay these holes out and transfer their locations to the front panel. Machine them and then mount the variac with four #10 x 1” bolts. In my unit, the variac terminal board was very close to the bottom of the box when installed (1/4”). I wasn’t comfortable with this small clearance, so I cut a piece of Formica laminate and glued it to the bottom of the box. This extra length also gave protection to the low voltage power supply (located at the lower left in Figure 3). I then laid out and machined openings for the fuse, power switch, and panel meters, which required rectangular holes (approx 1” x 3”).
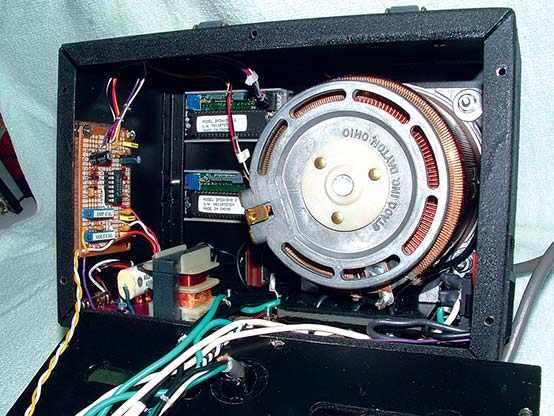
FIGURE 3. Internals
For any particular panel meter, first scribe out required rectangular openings on the front panel and then “hog” out as much material as you can with a large drill bit. Then clamp in a vise and clean up the rest with a file. By clamping a straight piece of wood in with it and lining it up with the layout line, you give yourself a nice filing guide. Better yet, use a hand nibbler tool. I have used one of these and for the price, it’s not a bad deal. I’ve included a part number for this in the Parts List.
The low voltage power supply is simple, and should remain trouble-free for a long time. There’s a technique I use that I’ve become fond of lately. Construct this on a piece of Formica laminate of the proper size (2-3/4” x 2” for mine). Lay out where the components will be and drill 1/16” or smaller holes for their leads. Push them through and connect the pigtail leads point-to-point and solder them up. Use solid #22 insulated wire for crossovers or longer runs. Epoxy the transformer in place and connect it up.
The whole assembly is mounted with two 6-32 bolts that are inserted through the drilled holes in the bottom of the box and the previously glued laminate on the inside bottom of the box. Nut these down to help hold the insulator in place (these nuts will also serve as board standoffs). Next, drop the board with matching holes onto these protruding screws and nut it down. I actually drilled these holes all at the same time by clamping all three pieces together in proper alignment and then drilling. (This was all done prior to the board component mounting, of course.) I like this method because it is cheap and simple, and looks attractive from the top side. The bottom side is pure ugliness, but is totally hidden from view when sandwiched in this fashion.
I use plated perfboard for any other types of circuits due to the number of holes required and the fact that removal/replacement may be frequent for debugging or circuit revisions.
Figure 3 gives a pretty good picture of the overall mounting of the major parts players: the variac (right side); low voltage supply (lower left); metering circuit board (left wall); and the panel meters (left front). There is one item that is mounted on the back cover and just out of sight in Figure 3 — a five screw terminal block to serve as a convenient connection point for all AC wiring and also the current sense resistor R14. The wiring on this block is shown in Figure 4.

FIGURE 4. Terminal block connertors
The metering board is a 1-3/4” x 2-3/4” plated perfboard from RadioShack that accepts DIP sockets nicely. This is installed in such a way that the volts and amps calibration pots (P1 and P2) are accessible when the back cover is removed. You could drill 3/8” holes in the back cover to avoid cover removal when calibrating.
Connecting leads were run out of one end of the board to the power supply board, to supply the required DC voltages. From the other end of the board, I ran two sets of four wires each to connect up with the panel meters. These were terminated in four pin SIP sockets and mated perfectly to the DPM’s input/power header. The only other components to install were a standard three-prong socket on the lower right hand wall of the box (as viewed from behind), the power cord, and an input fuse holder on the rear panel.
Theory of Operation
Figure 5 shows the low voltage power supplies and the variac wiring. The pos/neg 6.8 VDC supplies are derived through C12 directly from the 120 VAC line; this cap drops most of the input voltage. Half wave rectification is adequate here due to plenty of headroom for filtering and zenering by C13,C14 and Z1,Z2. These supplies will handle a moderate range of current for different op-amp circuits, as will be explained later. The positive 5 VDC DPM’s supply is derived from T1, which has dual 9 VAC secondaries. I had to parallel these to get the current needed for my DPMs, which are LED readouts and require about 120 milliamps of current. (I chose these for the large display digits and low price.) Again, half wave rectification works here due to the plentiful headroom available. If one were to use LCD readouts, then one of the 9 VAC secondaries could be freed up and used in place of C12.
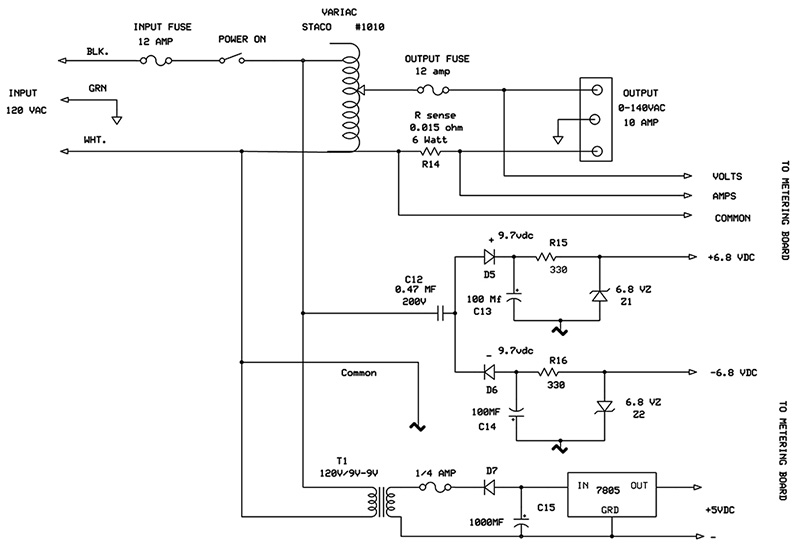
FIGURE 5. Power supplies
On the metering board (shown in Figure 6), the variac output voltage is monitored and brought in via a #22 wire connected to R1 at that point. Be aware that this point is electrically hot and can reach 140 VAC. I put a dab of silicone compound on it for added protection. R1 and calibration pot P1 divide this voltage down to a manageable value for the following circuit to handle. U1A buffers the voltage and feeds U1B, which is an ideal half wave rectifier circuit. It gives perfect linearity from several millivolts on up, due to the rectifier being enclosed in the op-amp feedback path. C2 filters this output peak voltage to a flat DC for the DVM. R5,R6 scale this voltage for the meter’s 200.0 millivolt range. It goes something like this: 120.0 VAC in at R1; 2.5 VDC at the C2,R5 junction; 120 millivolts DC at the R5,R6 junction; and 120.0 volts on the DVM display.
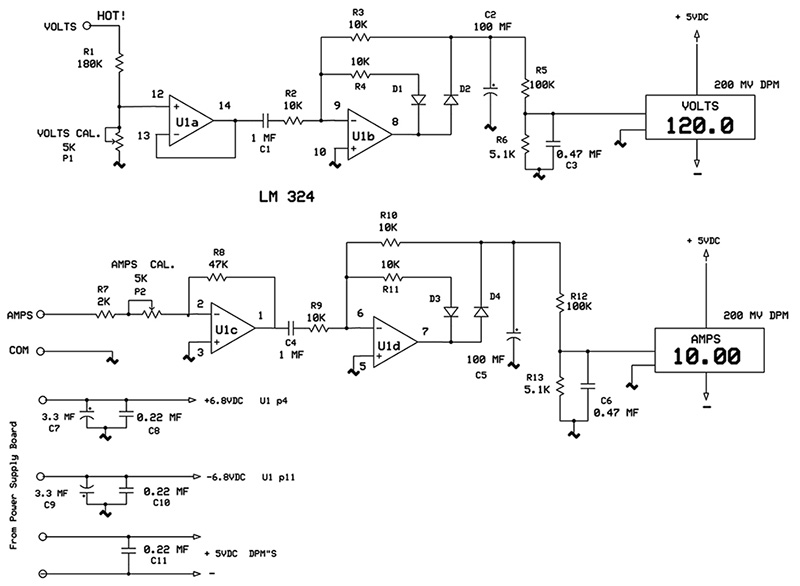
FIGURE 6. Metering circuits
You may be wondering why in both this circuit and the following amps circuit section their rectifier inputs are so high when we only need millivolts to drive the meters. Two reasons: Even though these are “perfect” rectifier circuits, more input drive increases their low end linearity. The other reason is that the subsequent divider (R5,R6) also divides and reduces any inherent DC offset voltage in the op-amp’s output and practically eliminates the need for any additional circuitry for that purpose. P1 — the volts calibration pot — not only calibrates the meter, but compensates for all the errors and tolerances in this circuit. Overall expected accuracy will be about ±1%.
The variac output current flows through R14 (this is actually two 0.03 ohm resistors in parallel) and develops a small AC voltage across it. This voltage is monitored and brought into the metering board and lands at R7. It is then amplified by U1C to a suitable level to drive U1D, which again is an ideal half wave rectifier circuit. The DC voltage at the C5,R12 junction and subsequent scaling at the R12,R13 junction are similar to the voltage metering circuit at its respective points. As far as the DPM meters go, just make sure its jumpers are correctly set for decimal point location and 200 millivolt operation.
However, if you choose a meter with a different range, you will have to adjust the values of R12, R13 and R5, R6 for correct scaling. The ammeter’s reading will drop off somewhat in accuracy below 50 milliamps, but in general, it is not much worse than the meter’s normal resolution at these levels, so it’s a moot point.
One word of caution here: In regards to the metering circuits I chose for this project, these are half wave rectifiers in which their peak reading is converted to pure DC for metering. These circuits will lose accuracy for non-symmetrical AC waveform cycles. Keep this in mind when making measurements on equipment that would alter the 60 cycle waveform. The good news is that this doesn’t happen too often.
A more accurate solution would be to use an ideal full wave rectifier circuit or an absolute value circuit in place of the half wave circuitry I chose. I found that the time constant of the required filtering slowed the tracking response down greatly when I used one of those circuits instead.
This makes voltage adjustment very annoying as you would have to creep the voltage control along very slowly in order for the voltage to settle to a stable enough reading for the DPMs to read it. This would not have presented as big a problem if I had used analog meters instead of digital ones as they tend to average outfluctuations for a more stable display. If one were to insist on “all situations accuracy,” those circuits are easily found in most op-amp books or even in a focused Google search.
As I mentioned earlier, nothing is engraved in stone in this article, so feel free to upsize, downsize, alter circuits to better suit your purpose, or build it exactly the way I did. No matter what you end up with, I am sure you will enjoy using it as much as I’ve enjoyed using mine.
As a closing note, I built this unit for just under $65 and some minor parts from my junkbox — a far cry from the $500 and up for a new commercial unit!
Also, one item I have recently added to the variac test setup is a 700 VA line isolation transformer (another steal from eBay). Aside from the safety aspect in some situations, it really improves oscilloscope presentations by eliminating a lot of low level noise and garbage since the scope now has a true common ground to the circuit under test. NV
PARTS LIST
| ITEM |
DESCRIPTION |
ITEM |
DESCRIPTION |
| R1,R5,R12 |
100K |
D1-D4 |
1N914 |
| R2-R4,R9-R11 |
10K |
D5-D7 |
1N4002 |
| R6,R13 |
5.1K |
Z1,Z2 |
6.8V zener |
| R7 |
2K |
P1,P2 |
5K 10 turn pot |
| R8 |
47K |
T1 |
120V-9V / 9V transformer Mouser #838-SB2812-1218 |
| R14 |
0.03 ohm / 3 watt (two required) Mouser #66-LOB5R030J |
| U1 |
LN324 |
| R15,R16 |
330 ohm |
DPMs |
200 mV DC
RSR LED panel meter #DM3A from: ELECTRONIX EXPRESS www.elexp.com |
| C1 |
1 µF / 10% ceramic |
| C2,C5 |
100 µF 16 V |
| C3,C6,C12 |
0.47 µF |
Variac Output Socket |
Mouser #693-4300.0701 www.mouser.com |
| C4 |
1 µF 10% ceramic |
| C7,C9 |
3.3 µF 16V |
Variac (mine) |
STACO #10-10 (10 amp,
120 VAC in, 0-140 VAC out)
This may be whatever brand or size you prefer. |
| C8,C10,C11 |
0.22 µF |
| C13,C14 |
100 µF 25V |
| C15 |
1000 µF 25V |
Downloads
What’s in the zip?
PCB files

